
New Pitcher Instructions
|
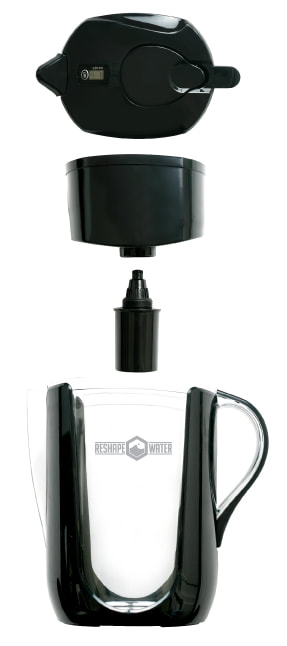
1 - Remove your pitcher and the filter from their packaging.
2 - Rinse the pitcher and the water reservoir off in clean water. 3 - Wipe the lid off with a damp cloth, do not submerge the lid in water as the digital timer is not water proof. 4 - Press and hold the “SET” button on top of the lid until it reads “60 Days”. This will count down to indicate when a new filter is needed. Repeat this step with all new filters. 5 - Soak the filter in room temperature water for 10 minutes ensuring the filter is fully submerged under water. You should see air bubbles indicating water is entering the filter. 6 - Take the filter and screw it into the bottom of the water reservoir. Do not over-tighten. 7 - Reassemble the entire water pitcher unit. 8 - Fill the top reservoir, stopping 1/2” from the top. Let this water filter completely through to the bottom of the pitcher (takes about 10 minutes). DISCARD THIS WATER. This removes excess activated carbon and manufacturing particles from the filter. 9 - Repeat step #8. DISCARD THIS WATER. This step is optional. Skipping this step may result in trace amounts of carbon remaining in your filtered water. It is completely harmless and may be consumed. Your pitcher is now ready to be filled and the water is ready to drink. Enjoy! |
New Filter Instructions
|
Start at Step #4 above.
|
|
Please Note:
|
Our filters are designed to slowly filter your water. Slow filtration time is normal (about 5 minutes per 1 liter). The stream of water exiting the filter should be smooth and approximately the size of a pencil’s lead.
Store extra filters in their original foil packs in a cool & dry place, out of direct sunlight. Dispose of after 60 to 75 days of normal use; sooner with heavy use. The plastic shell can be recycled and the internal elements are landfill safe. Using a filter longer than the recommended time may be harmful to your health. Saturated filters will start to release unwanted elements back into your filtered water. Replace every 60 days and no longer than 75. |

|